Exporting Microsoft 365 mailbox content to PST is typically used for litigation. However, it also works as a workaround for backup, archiving, and migration. In a previous article, I showed you how to use this mechanism with the eDiscovery tool. This article shows how to achieve similar results using PowerShell and the New-ComplianceSearch cmdlet (including some follow-on cmdlets).
requirements
Before you begin, you need to make sure you meet the following requirements:
- You are an eDiscovery manager or an eDiscovery administrator – these are the only default role groups that contain the required roles export Role.
- You’ve started a remote connection to the Microsoft 365 Security & Compliance Center (read more on this Microsoft website).
Export Microsoft 365 mailboxes to PST
Before exporting mailboxes to PST, you need to use the New-ComplianceSearch cmdlet to create a search. In the example below, I search for all Exchange Online mailboxes and start the search immediately.
New-ComplianceSearch "your_descriptive_name" -ExchangeLocation all | Start-ComplianceSearch
Next, I use the New-ComplianceSearchAction cmdlet to export the data returned by the new compliance search.
New-ComplianceSearchAction "your_descriptive_name" -Export -Format Fxstream
Once the tool has finished exporting the results, you can run the Get-ComplianceSearchAction cmdlet to find the URL required to download the exported data:
Get-ComplianceSearchAction "your_descriptive_name_export" -IncludeCredential | FL
That Results Add two pieces of information you need to download the PSTs: the Container URL
and the SAS token. Together they form a complete URL.
For more information on using New-ComplianceSearch and related cmdlets, see this article.
Now I could play with that start process
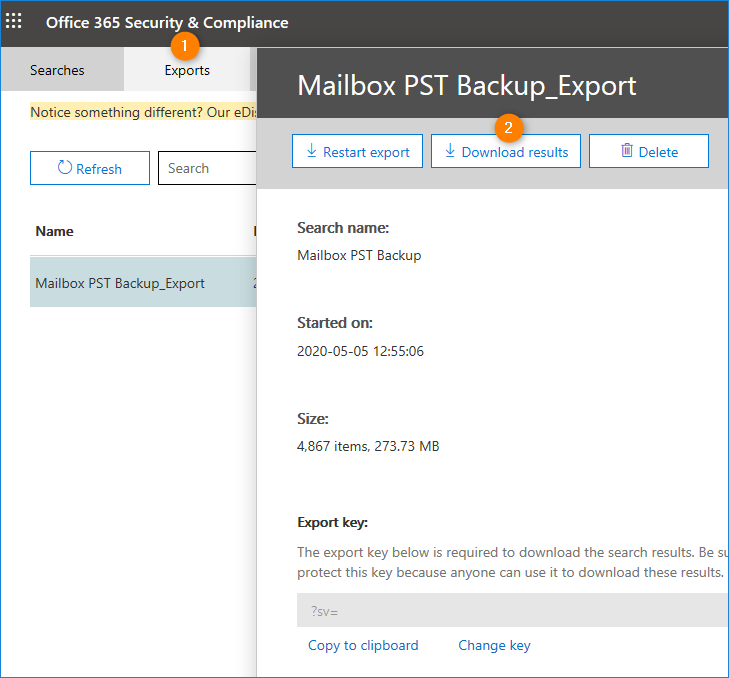
cmdlet and search the entire LocalApps directory for the exact location of the Unified Export Tool (aka eDiscovery Export). But I find it much easier to launch it from the eDiscovery web panel (which you have to visit to download the tool anyway) and paste the link and target PST location directly into the Unified Export tool. Go to Content search in the Microsoft 365 Security & Compliance Centerfind your export job and click on it Download results to run the eDiscovery Export tool.
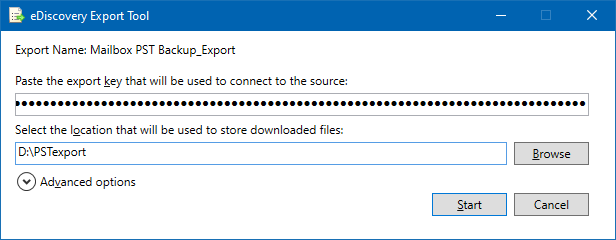
The eDiscovery Export Tool is a ClickOnce application and works like a charm if you’re using IE or Edge. To run it successfully in another browser, for example Google Chrome, you need one ClickOnce extension. In the export tool, paste the SAS token. Once you have selected the destination location for the PST files, you can click
beginning to download data.
But you might be wondering, “Why even use PowerShell when you could still get the job done at EAC?” Personally, I find it’s a bit faster this way, especially since I don’t have to constantly refresh the browser to use the search or see export progress. Instead, I just occasionally send a Get-ComplianceSearch or Get-ComplianceSearchAction one-liner to check how the job is progressing.
Alternative backup and archiving option
PST backup or archiving is better than having no additional layer of security at all. However, PST files don’t excel in the reliability department. If you want to try a reliable Microsoft 365 backup tool instead, try CodeTwo Backup for Office 365. Watch the short video below to see what it can do.
See related articles: