
Inbox rules in Office 365 (or Microsoft 365, if you prefer the newer name) help users and admins make Outlook a better place. They can be used to combat distractions, organize things, block unwanted correspondence, or auto-forward selected emails. Given the endless flow of information that flows into Outlook, it’s invaluable. In this article, I’ll show you how to work with Office 365 inbox rules using PowerShell.

Server-side vs. client-side inbox rules
Before we get into managing inbox rules, there is one thing that needs to be explained. There are two types of inbox rules – server-side and client-side (client only).
Server-side inbox rules run at the server level. This means that they are applied regardless of whether Outlook is on or off. They are similar to mail flow rules, but there are fewer conditions, exceptions, and actions to choose from. Also, email flow rules are applied while an email is in transit and not set up per mailbox. While these rules are more versatile, there are some things they can’t do, and this is where inbox rules come in handy.
Client-side or only client-side inbox rules are exclusive to Outlook for Windows. They were also available in Outlook for Mac, but have been discontinued since the launch of the “new Outlook for Mac” in October 2020. While basic information about these rules is stored online in the mailbox on the Exchange server, these rules are executed by the email client (your “desktop Outlook”). So if you get a new email in your mailbox while Outlook is disabled, client-side inbox rules won’t run.
While this difference has little impact on the user in most cases, it is critical from the administrator’s perspective. Why? Because while you can list every client-side rule of every user with PowerShell, you have to tip Create a client-only rule this way. Additionally, using some PowerShell cmdlets will remove disabled client-side rules, and outbound rules will also be removed. These “destructive cmdlets” are listed below:
- New-InboxRule,
- Set-InboxRule,
- Remove-InboxRule,
- Enable InboxRule,
- Disable-InboxRule
Using any of these cmdlets may violate some carefully crafted, user-created Outlook rules. The only secure cmdlet is Get-InboxRule, which allows you to view all the rules that apply to a specific mailbox.
The tricky part is that it can either be the condition of a rule or the action that a rule takes on the client side. As you will see, in some cases it can be difficult to find out whether a rule only applies on the client side or on the server side.
Check the rule type
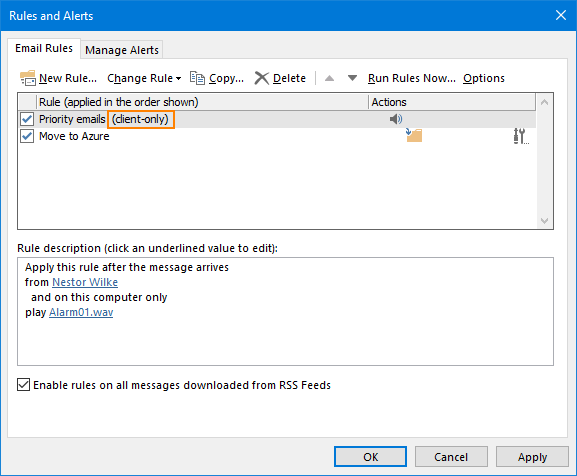
If you’re using Outlook or Outlook on the web, finding a rule’s type has never been easier. Outlook for Windows adds this information (for clients only) to each such rule:
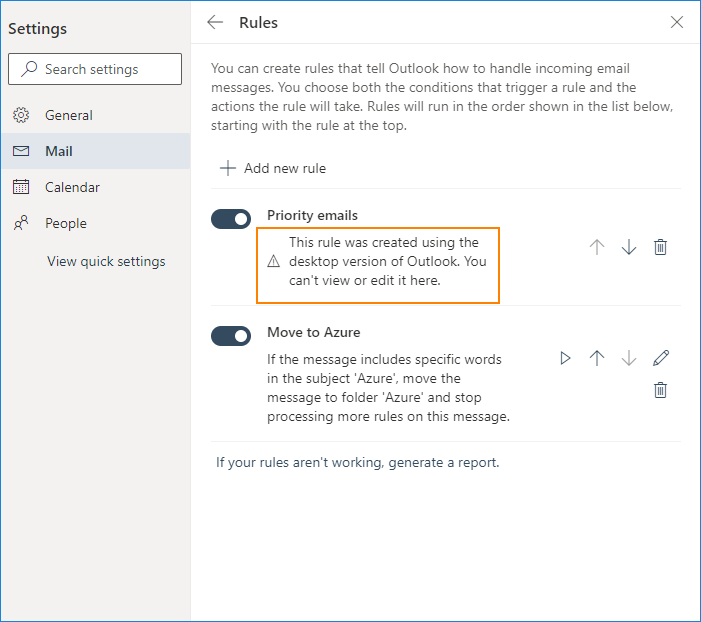
Outlook on the web shows a fairly verbose warning:
Finally, this page from Microsoft lists conditions and actions that make a client-only rule. However, note that the following conditions:
- with specific words in the subject,
- marked as important
- marked as sensitivity,
- marked for action,
- with certain words in the message body/message header/recipient address/sender address,
and actions:
- put it in the category
- Mark as read
can by using certain parameters to be applied New-InboxRule Cmdlet used to create a server-side rule.
Tests show that when you create an inbox rule to mark emails as read in Outlook, it is client-side. But when you create the same inbox rule in Microsoft 365 using PowerShell, it’s server-side. Hope that clears things up.
Export Microsoft 365 inbox rules using PowerShell
It can be useful in at least two scenarios to export your users’ Microsoft 365 inbox rules:
- If you choose to manage these rules using PowerShell (which may delete some of the custom rules, as mentioned earlier).
- If you ever need to troubleshoot inbox rules for your users.
You can manually export inbox rules to a .rwz file by using Rules > Manage rules and alerts > options in Outlook. The benefit is that these rules can easily be imported back into Outlook should anything go wrong. The downside – an administrator would either have to log into each mailbox and do the export manually, or outsource this task to the users.
You can also export inbox rules using PowerShell. The main benefit is that you can do it in seconds (not counting the time it takes PowerShell to run the task). The nasty downsides are that you don’t get the whole picture about the client-side rules and there’s no easy-to-use import function. However, when troubleshooting inbox rules for a user, having limited history and absolutely no data makes a world of difference.
The following short script exports a list of all inbox rules from every mailbox in the organization. The results are exported to separate CSV files, one for each mailbox:
$mailboxes = get-mailbox
foreach ($mailbox in $mailboxes) {get-InboxRule -Mailbox $mailbox.UserPrincipalName | export-csv "C:\$mailbox.csv"}
Learn more about using inbox rules
Get-InboxRule provides a way to see how many rules a company is using. For example, you can check how many rules a user has configured:
$mailboxes = Get-Mailbox
foreach ($mailbox in $mailboxes) {
Write-Output $mailbox.id,((Get-InboxRule -Mailbox $mailbox.Id)|Measure-Object|select count)
}
From the output you can learn the following:
- It’s completely safe to manage inbox rules in your Microsoft 365 tenant as most users don’t have any rules configured, or
- Touching a few rules with PowerShell can backfire for some mailboxes since they have hundreds of rules configured.
You can also search for specific rules, for example inbox rules used to route email:
foreach ($mailbox in $mailboxes) {
Get-InboxRule -Mailbox $mailbox.UserPrincipalName | where ForwardTo;
Get-InboxRule -Mailbox $mailbox.UserPrincipalName | where ForwardAsAttachmentTo
}
If the script returns rules, you can use Get-InboxRule to learn more:
Get-InboxRule -Identity <InboxRuleIdParameter> | FL
Side note: This is only an example. By default, creating a forwarding rule triggers a low-severity security alert. You can toggle this setting in the Microsoft 365 Defender admin center. There are also several ways to prevent automatic forwarding in Exchange Online.
Create a new inbox rule for everyone
One of the biggest benefits of managing Outlook rules with PowerShell is that you can quickly create a rule set for each mailbox in your organization without user involvement. Look at this example:
Your communications department has concluded that notifications hurt productivity (which they do). A constant barrage of notifications can render most people useless. One way to address this is to automatically mark all incoming emails as read. Used in conjunction with the Inbox 0 workflow, this is an effective way to prevent users from checking their inbox every 15 seconds when low-priority emails reach them. This can also help users become more confident and break the habit of checking their mailbox over and over again.
Your task is to introduce such a rule for all mailboxes in the company. You can do this with a few simple lines of PowerShell code. To make things more interesting, let’s add an exception – an email shouldn’t be automatically marked as read if the message is from the CEO or if it’s set to High Importance. The code is as follows:
$mailboxes = get-mailbox
foreach ($mailbox in $mailboxes) {
New-InboxRule -Mailbox $mailbox.UserPrincipalName -Name "Mark all as read" -MarkAsRead $true -ExceptIfFrom [email protected] -ExceptIfWithImportance High
}
For more information about inbox rules, see Manage users’ Outlook rules in the Exchange Management Shell. Although this article focuses on Outlook rules in on-premises Exchange, the insights there also apply to Microsoft 365.